Difference between revisions of "SmartFileSystem"
| Line 52: | Line 52: | ||
8. The previously green bar representing the new partition will now turn to brown colour to signify that it has a new filesystem. | 8. The previously green bar representing the new partition will now turn to brown colour to signify that it has a new filesystem. | ||
| + | |||
9. Press the button named '''OK - accept changes''' to make the changes and finally '''Save to disk''' to commit the changes to the hard disk. Once you exit '''Media Toolbox''' the system will need to be rebooted to reload the Kickstart and recognise the new partition added. | 9. Press the button named '''OK - accept changes''' to make the changes and finally '''Save to disk''' to commit the changes to the hard disk. Once you exit '''Media Toolbox''' the system will need to be rebooted to reload the Kickstart and recognise the new partition added. | ||
| + | |||
10. Format the new partition by right clicking on the drive icon on '''Workbench Screen''' and then selecting '''Format...''' option. | 10. Format the new partition by right clicking on the drive icon on '''Workbench Screen''' and then selecting '''Format...''' option. | ||
Revision as of 00:35, 21 October 2015
Introduction
SmartFileSystem (SFS) is a 64-bit journaling file system for both the Amiga (AmigaOS 3) and AmigaOne (AmigaOS 4) series of computers.
Installation on AmigaOS 4.1
1. Copy the file SmartFileSystem to your Kickstart directory in your System partition (SYS:)
2. Adding it to your Kicklayout:
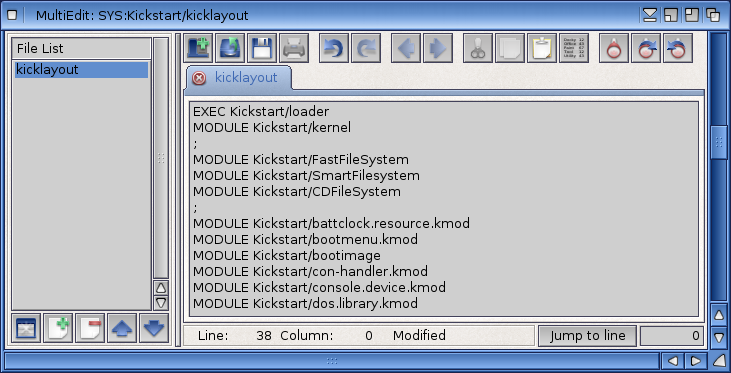
- Open MultiEdit and select Open... from the Project menu. In the file requester select the Kickstart directory in the SYS: drive. Then select the Kicklayout file and click the Open icon on the toolbar.
- Add the following line of MODULE Kickstart/SmartFileSystem to your Kicklayout file (paying attention to replicate it exactly as shown in the image below)
- Once you have added the line you can Save your work by selecting Save file from the Project menu or clicking the Save icon on the toolbar.
Creating a SmartFileSystem Partition
WARNING: ADDING A PARTITION TO A HARD DISK CAN POTENTIALLY ERASE ANY DATA ON THE DRIVE. ALWAYS BACK UP ALL DATA BEFORE MODIFYING YOUR HARD DISK DRIVE
1. Open MediaToolBox which can be found in the System drawer.
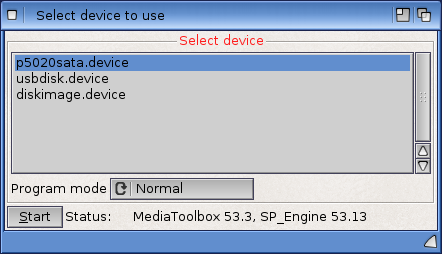
2. Select the device of appropriate to your hard disk and computer system and press Start button. For example: hard drives connected directly to the AmigaOne X5000 motherboard are on the p5020sata.device
3. Select the hard disk unit number from the list and Edit partitions and filesystems will become active, so click on this button.
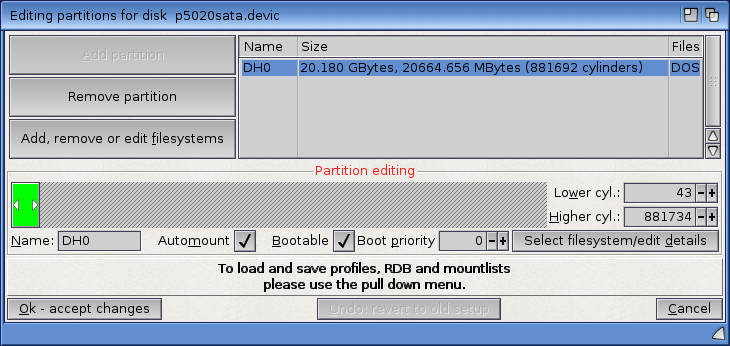
4. A window will appear named Editing partitions for disk .... The Partition editing section shows the current partitions and any blank unpartitioned space on your hard disk. Click in the blank space to highlight it and the Add partition button will become active. The blank space will become filled with a green block. Either end of the green block are slider arrows. They can be clicked and dragged to move or resize the partition.
5. Give the newly created partition a unique device name in the Name text box. The usual convention on the Amiga is to name partitions consecutively such as DH0, DH1, DH2, DH3 and so on. Usually DH0: is the boot system partition so the Bootable checkbox must be selected.
6. Click the button named Select filesystem/edit details
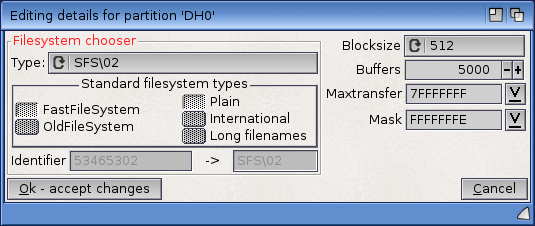
7. A window will appear named Editing details for partition .... Select the Type cycle gadget until it reads Custom filesystem. In the Identifier text box, remove the contents and enter the value of 53465302. When you hit the Enter key you will notice that the adjacent text box changes to SFS\02. Finally click the Ok - accept changes button.
8. The previously green bar representing the new partition will now turn to brown colour to signify that it has a new filesystem.
9. Press the button named OK - accept changes to make the changes and finally Save to disk to commit the changes to the hard disk. Once you exit Media Toolbox the system will need to be rebooted to reload the Kickstart and recognise the new partition added.
10. Format the new partition by right clicking on the drive icon on Workbench Screen and then selecting Format... option.


